Finding and Querying Networks
Last updated: March 16th, 2022
Overview
The public NDEx site includes many networks that are marked as "PUBLIC" and are therefore accessible without signing in to a user account. Public networks can be found, viewed, and queried.
This page provides details about searching networks as well as running neighborhood queries on a specific network.
Some Public Networks on NDEx
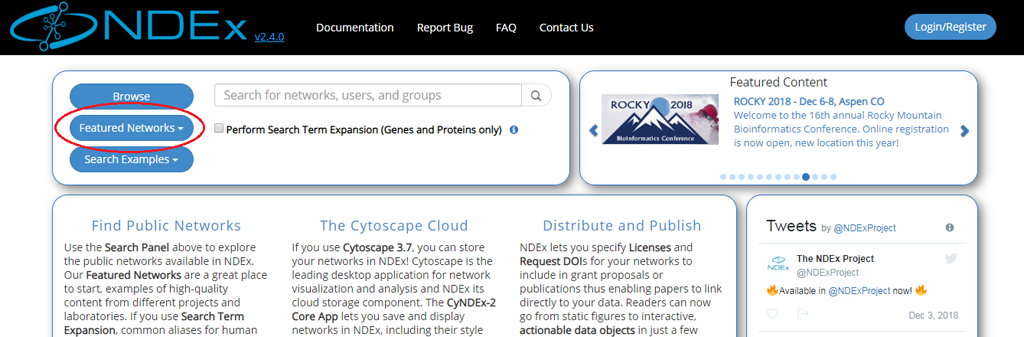
- The easiest way to access high quality public networks in NDEx is through the Featured Networks button.
- The button is located in the search module and marked with a red oval in the image below:
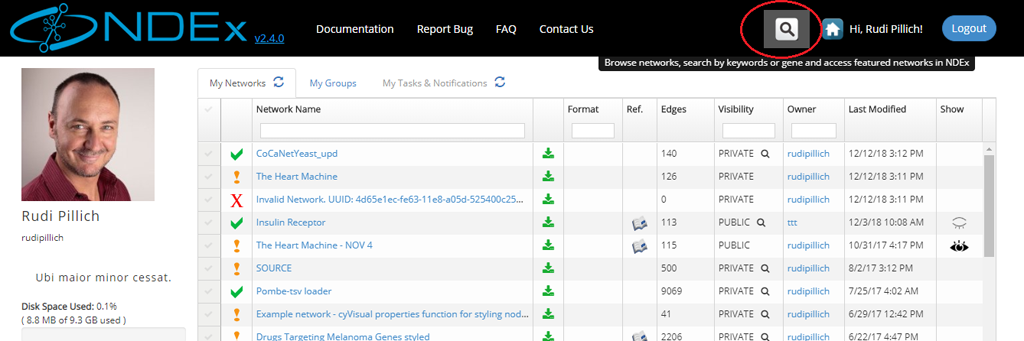
- The search module can easily be accessed from any other pages of the NDEx web app using the Magnifier button available in the top menu bar as shown in the next image:
Searching for Networks Based on Title and Description
- The Search Examples button shows a few examples of possible searches.
- The Browse button lets you view all the public networks available in NDEx sorted by most recent.
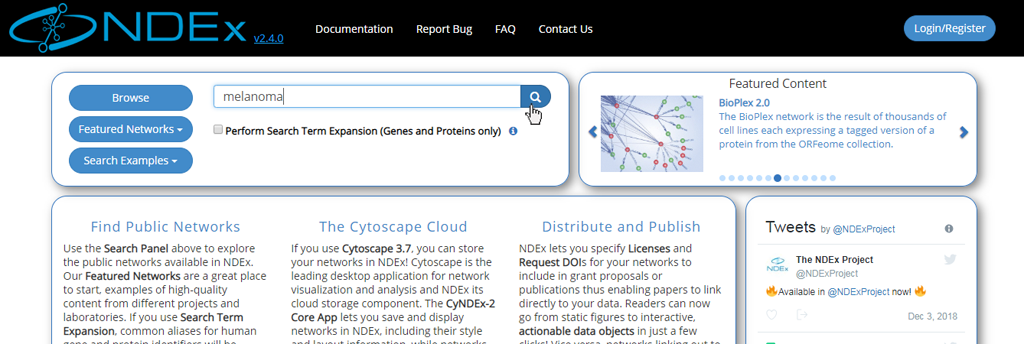
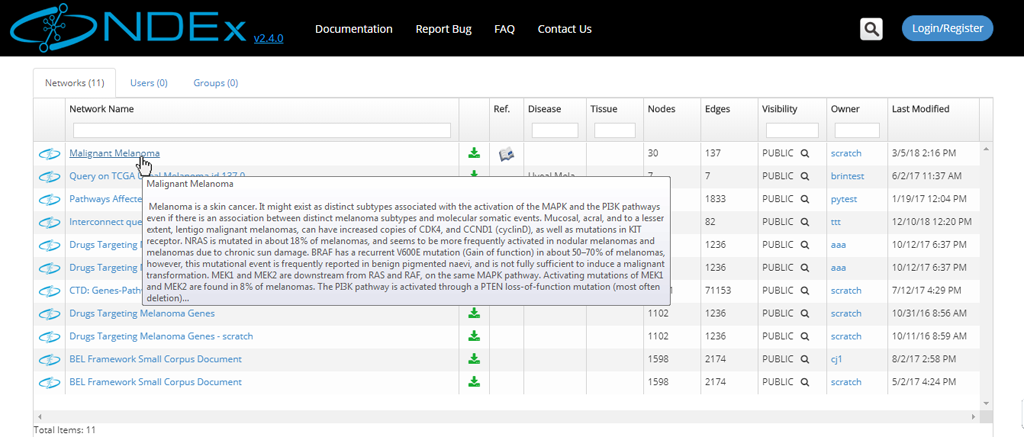
- Search terms can be entered directly into the search bar: try running a search for "melanoma".
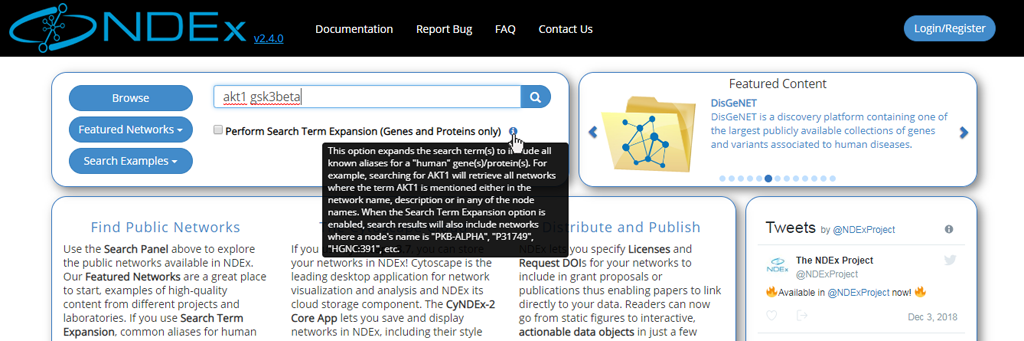
- You can also search for one or more genes of interest.
- When searching for genes or proteins, you can decide to enable the optional Search Term Expansion feature.
- More info about this feature is available further down in this manual.
- Web app embedded documentation can be accessed by pointing your mouse to the blue "info" icon as shown in the image below:
- The network search results page displays all the hits and provides basic info about the networks, such as format, owner, last modification date etc.
- If you hover on a network name, a pop up window will display the network description.
- Only public networks are returned in a search; a private network will only appear in a search if you have been granted access to that network by its administrator or if you are the owner of that network.
View a Network Found in a Search
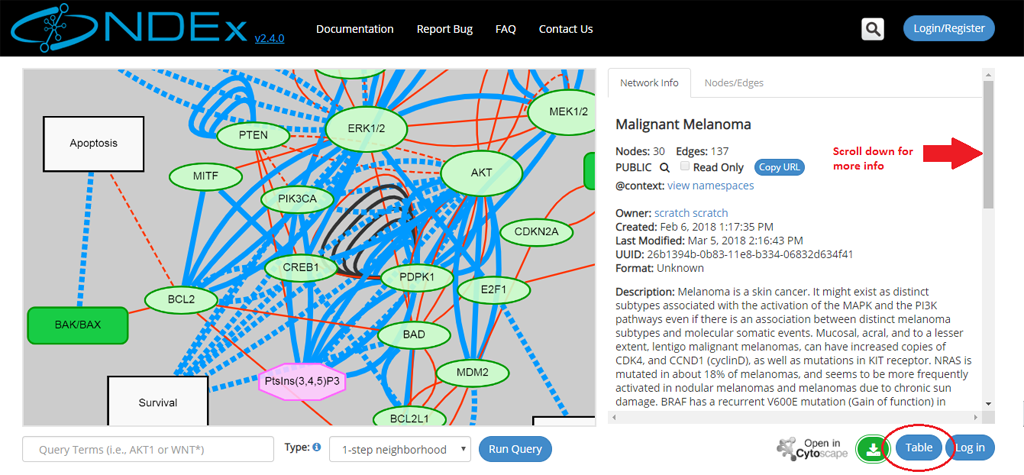
- To inspect a network, click its name.
- The network page will open up: information about the network is displayed in the info panel on the right.
- You can scroll down to view all information in this section, including the network description, reference info and various network properties (if any are available).
- You can always switch to a tabular view using the Table button in the bottom right part of the page (red oval below). Once toggled, that same button allows you to go back to the graphic view.
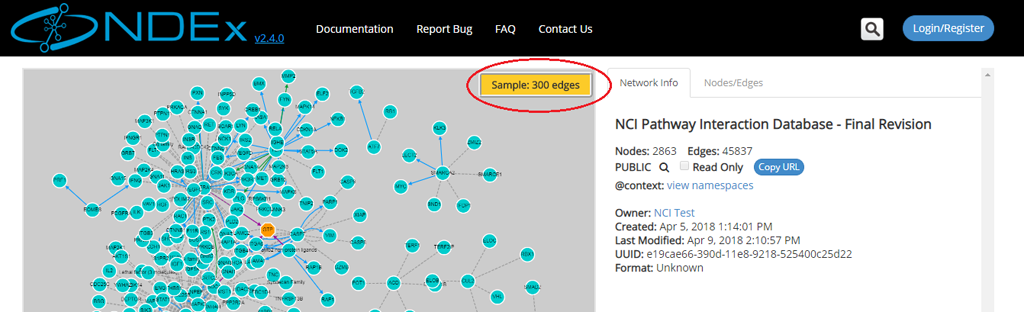
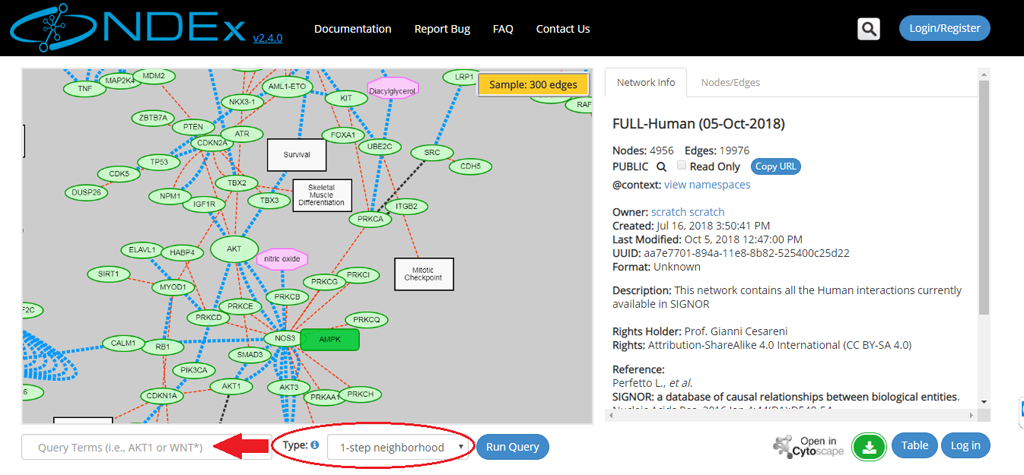
- The left part of the screen contains the network graphic rendering. For large networks, this area will contain a random 300 edges sample of the network as shown by the red oval in the next screeshot:
Advanced Search Capabilities
Starting from NDEx v1.3, a stand-alone Apache SOLR service is used to implement Lucene Indexing. Advanced search capabilities allow users to search (and query) networks using keywords or other network attributes. A complete list of the indexed attributes is available in the tables below.
SEARCH: Indexed network attributes
Note that some attributes below are highlighted in blue text. These are NDEx internal attributes and are not encoded in the CX networkAttributes aspect. In the case of attributes like ‘edgeCount', they are calculated values.
| Attribute | Description | Type |
| name | Network title | freetext |
| description | A description of the network, its content and data sources | freetext |
| version | Network version | freetext |
| labels | Users can use this property to specify custom tags | freetext |
| methods | Description of methods used to generate the network | freetext |
| networkType | Specifies the type of interactions in the network (protein, genetic, chemical, etc) | freetext |
| organism | Description of organisms associated with the network | freetext |
| disease | Description of diseases associated with the network | freetext |
| tissue | Description of organs, tissue types, cell types, and cell lines associated with the network | freetext |
| rightsHolder | Describes the holder of the rights to the network – same as dc:rightsHolder | freetext |
| rights | Description of the rights asserted by the rightsHolder – same as dc:rights. The indexing of this general field should aggregate not only the actual ‘rights’ attribute but the more specific rights attributes, such as copyright or license. In that way, network authors do not need to state information redundantly | freetext |
| author | Individuals responsible for creating the content of the network – see dc:contributors | freetext |
| creationTime | Time at which the network was created | date |
| modificationTime | Time at which the network was last modified | date |
| edgeCount | Number of edges in the network | integer |
| nodeCount | Number of nodes in the network | integer |
| visibility | NDEx network visibility: Public, Private | string |
| uuid | This corresponds to the externalId ndexStatus element attribute | string |
| owner | This corresponds to the user account name that owns a network | string |
SEARCH: Indexed node attributes
| Attribute | Description | Type |
| nodeName | Name of node | freetext |
| represents | Primary node identifier | string |
| alias | Alternative node identifier(s) | string |
NEIGHBORHOOD QUERY: Indexed node attributes
When performing a neighborhood query, in addititon to nodeName, represents and alias, all other text fields are also indexed, thus allowing users to query the network for any text-containing node attribute values.
Advanced Search Examples
- You can search for networks using keywords: type "metabolism" in the search bar and hit enter. The system returns all networks that have the term "metabolism" in their name, description or associated to its nodes and/or edges.
- You can also use wildcards: if you type "met*" the system will return all networks that have metabolism, metabolic, methionine, metformin and the met gene referenced in their title, description, nodes or edges. In the screenshot below, the last network has the keyword "metabolic" in its description (red circle).
- However, if you tipe "name:met*", the system will only return networks that have those terms in their name: in the screenshot below, you can see that the network called Biosynthesis of Sterols is missing as the term "metabolic" is contained in its description.
- If you know the unique identifier (UUID) of a network, you can search NDEx using this information: type "uuid": in the search bar followed by the UUID of the network you are looking for.
- You can search networks specifying a range of values: type "nodeCount:[11 TO 79]" in the search bar and press enter. The system will return all the available networks that have between 11 and 79 nodes.
- You can search networks based on when they were created or last modified: type "creationTime:[2016-02-26T00:00:01Z TO 2016-02-27T23:59:59Z]" and press enter. The system will return all available networks that were created between 12:01 am on Feb 26, 2016 and 11:59 pm on Feb 27, 2016. Do not confuse creation time with last modification time (red circle below).
- You can search networks owned by a certain account. To do this, typea range of values: type owner: followed by the user account name. For example, try to search for owner:ndextutorials. The system will return all the available networks that are owned by the account "ndextutorials".
- You can perform complexes searches combining several keywords and properties. For example, let's search all networks that have the keyword ‘metabolism" in their name and have no more than 5000 edges: type "name:metabolism AND edgeCount:[1 TO 5000]" and press enter to get the results
Search Term Expansion
Starting from NDEx 2.1, you can decide to perform Search Term Expansion on genes and proteins. This feature expands your search term(s) to all its possible synonims and runs a search using all of them. This makes sure that you will find all networks that have your genes/proteins of interest even if the genes/proteins of interest are listed using an uncommon synonim or an alternative identifier.
- Search Expansion is limited to human terms only. So, if you search for a yeast gene/protein, the search will be performed accordingly but no Term Expansion will occur.
- Performing a search for human genes/proteins with Term Expansion will return more results compared to the same search performed without Term Expansion.
- To use the Search Term Expansion feature, just type your genes/proteins of interest in the search box and mark the "Search Term Expansion" checkbox as shown below:

- Please not that Search Term Expansion is not compatible with Lucene Syntax.
- For more information and details about Lucene Syntax, please refer to the Lucene Documentation.
Query for a Neighborhood in a Network
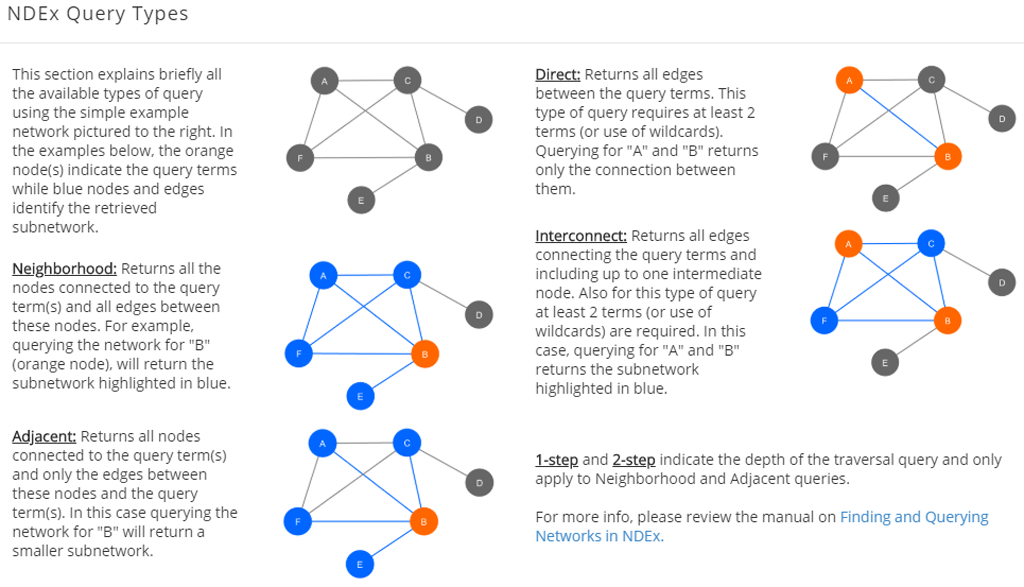
Network queries can be used to find a sub-network in a network, a group of nodes (and their connecting edges), based on user-defined query term(s). NDEx allows users to run 4 types of queries: Neighborhood, Adjacent, Direct and Interconnect. To run a query on a network of interest:
- Type the query term(s) (for example: a gene name) in the query text box (red arrow).
- Select the type of query from the dropup menu (red oval); the 4 types of query are described in more detail below and web app embedded documentation is also available by clicking the blue info icon next to the Type dropup menu.
- Click the Run Query button.
Query Types
- Neighborhood: returns all the nodes connected to the query term(s) and all edges between these nodes.
- Adjacent: Returns all nodes connected to the query term(s) and only the edges between these nodes and the query term(s).
- Direct: returns all edges between the query terms. This type of query requires at least 2 terms (or use of wildcards).
- Interconnect: returns all edges connecting the query terms and including up to one intermediate node. Also for this type of query, at least 2 terms (or use of wildcards) are required.
- The retrieved neighborhood pictured below is a small network specified by the "smad3" term, consisting of "21 nodes" and "75 edges".
- All the retrieved nodes and edges can be interactively inspected using the graph and info panel on the right
- Users can also inspect the query result in tabular format or download the result as a tab-separated text file thanks to the buttons available in the bottom right corner of the screen
- Logged in users also have the option to save the result to their NDEx account page
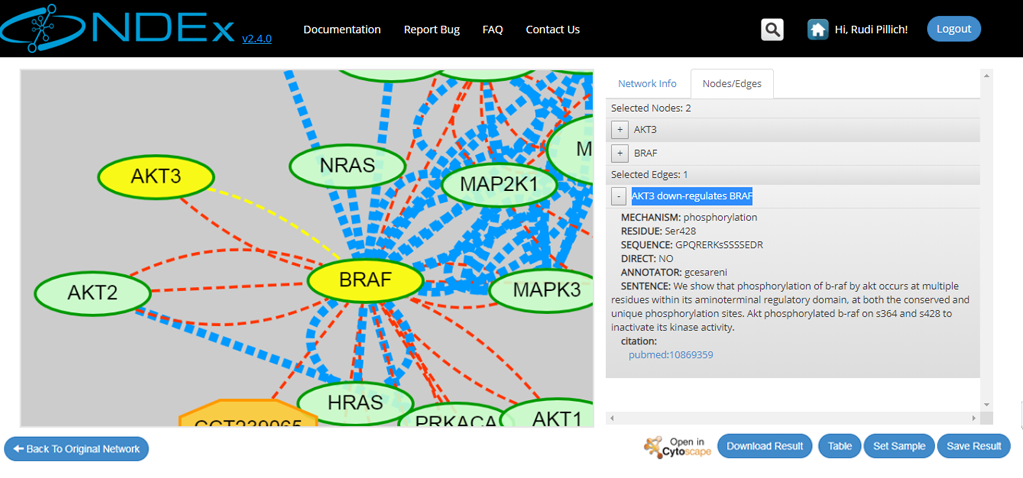
- Click "Back to Original Network" to clear your query result and go back to the previous screen
- For large networks, users can decide to set the query result as display sample of their network and override the default, system-generated sample view. To do this, you must be logged in to your account and have either Admin or Edit permission on the network; then simply click the "Set Sample" button available in the query result page.
- Finally, users can decide to open their query result in Cytoscape to further annotate the network or run an analysis. If all requirements are satisfied, the "Open in Cytoscape" button will be colored and available to click.